What to do if Windows cannot check for updates
- Run Windows update troubleshooter
- Reset Windows update settings
- Update RST driver
- Clear your Windows update history and restart the Windows update service
- Restart the Windows update service
- Reset Windows update repository
- Use system restore point
- Temporarily disable anti-virus and firewall protection
Most of Windows updates address security issues. These are the worst possible problems as they may be exploited by malware or hackers.
However, updates may address other bugs and issues in Windows 10. Even though they are not responsible for security vulnerabilities, they might impact the stability of your operating system.
There are times when you might encounter an error while checking for updates, such as: ‘Windows update cannot currently check for updates because the service is not running’.
Even if you restart your computer and try again, you will face the same error. If this is the case, keep on reading this guide in order to find out what’s the right solution to your problem.
Want the best tool to fix Windows update issues? Here are the best choices!
SOLVED: Windows Update Service is Not Running
Solution 1: Run the Windows update troubleshooter
Windows has a built-in troubleshooter that can help you check and fix issues with Windows Update. It is always a good method to consider whenever you encounter any problem running Windows Update.
In order to do this:
- Type troubleshoot in Windows Search bar and click on Troubleshooting
- Click Fix problems with Windows Update and then Next
- Restart your computer and again try to install the updates
You can also run the Update troubleshooter from the Settings page.
Alternatively, you can try one of these more user-friendly troubleshooting tools!
Solution 2: Turn off Windows Update
Turning Windows Update off and then on through Control Panel has fixed this error for many users because it resets any inconsistent settings of Windows Update. To do that on older Windows versions:
- Click on Windows Update in the search results and then click on Change Settings
- Under Important updates select Never check for updates and click OK
- Go to the Windows update settings window again and select Install updates automatically and click OK.
The steps to follow may be a bit different on newer Windows 10 versions. Irrespective of the steps to follow, you need to turn off Windows Update, restart your computer and then turn the service back on.
For more information on how to block updates on the latest Windows 10 versions, use these guides:
Solution 3: Update RST driver
This error could appear as a result of your RST (Intel Rapid Storage Technology) driver being outdated, corrupted or missing.
Thus, you should update your RST driver manually by going to the official Intel website, and searching for the most recent correct driver.
Please make sure you choose the drivers that are compatible with your version of Windows.
Solution 4: Clear your Windows update history
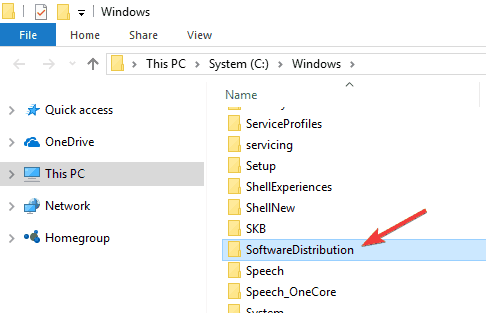
The Software Distribution folder stores temporary files for Windows Update.
You may get the error due to corruption issues with these files. A good solution is to remove the content of this folder. In order to do this, please follow the steps described below:
- Press Windows + R keys in order to open Run command box
- Type services.msc and click OK
- Right-click on Windows Update and then click Stop
- Open Windows Explorer and navigate to C:Windows folder
- Find and delete the Software Distribution folder
- Go back to the windows Control panel, right-click on Windows Update service and select Start
- Restart your computer and then run Windows Update
Editor’s Note: This article continues on the next page. If you’re interested in learning more about Windows Update, check out our wide collection of guides.


