WordPress admin makes it easy to manage configurations without touching a line of code. These basic configuration settings are then stored in the wp-options table inside the database. But, WordPress also has a separate configuration file, called wp-config.php, that can be used for further customizations.
Wp-config is the file where your custom hosting data (database name, database host, etc.) is saved when you install a self-hosted WordPress site. You can also add other configuration options to this file, with which you can enable or disable features such as debugging, cache, multisite, SSL login, automatic updates, and many others.
Read Also: 15 Useful .htaccess Snippets for Your WordPress Site
Localize and edit wp-config
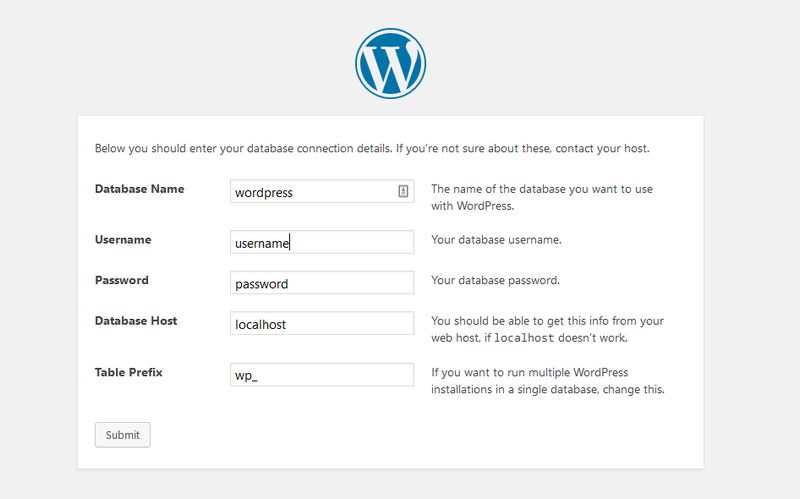
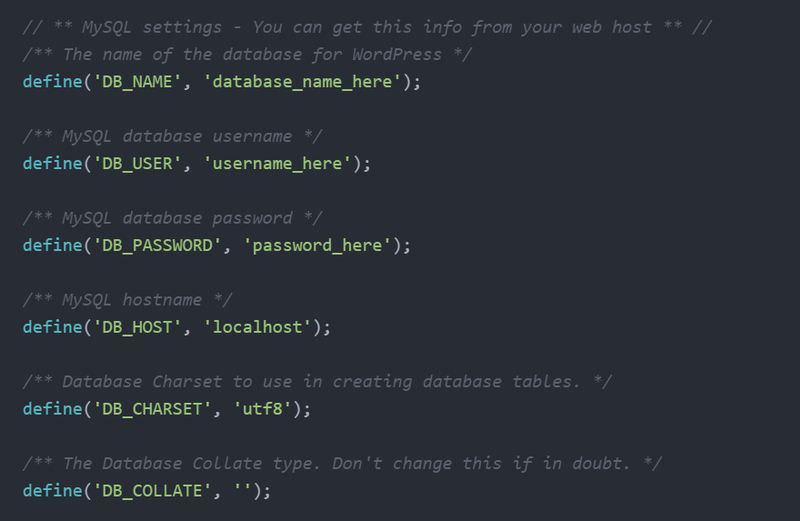
When you download WordPress, the wp-config.php file is not yet present inside the install folder. However, there’s a file called wp-config-sample.php that you need to copy and rename to wp-config.php. Then, you need to add your basic connection data (database name, database username, database password, hostname, security keys) to this file.
If your hosting provider uses the Softaculous auto installer (most do so) this process is automated for you and you will find a wp-config.php and a wp-config-sample.php file in your root folder when you connect your server via FTP.
Note that the order of settings matters, so don’t rearrange them. When editing the wp-config file, always use a code editor such as Sublime Text, Atom, Notepad++, Visual Studio Code, or TextMate. Word processors (Microsoft Office, Google Docs, LibreOffice, etc.) will mess your file up, never use them to edit code files.
The settings saved into wp-config override the database, in case the same type of configuration is present at both (e.g. home URL)
Where to place the code snippets
In this article, you can find 20 code snippets with which you can use to customize your wp-config.php file.
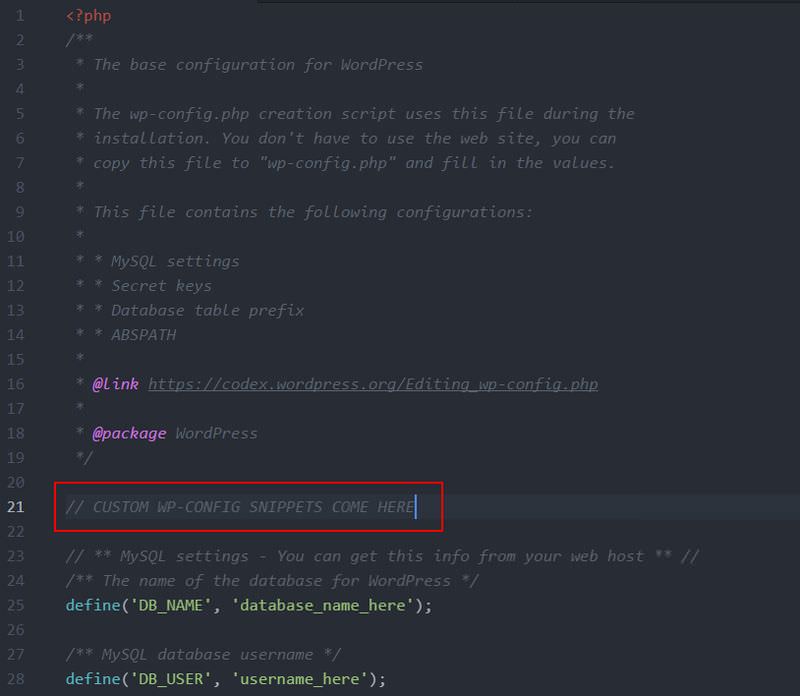
Most of these configuration options don’t exist in wp-config by default. If you want to use them you need to add them below the starting <?php tag and code comments, but above the MySQL settings.
1. Turn on WP debugger
You can turn the WordPress debugger on and off in the wp-config file. The first snippet below does exist by default in wp-config (below the database configurations) but its value is set to false. To turn the debugger on, change its value to true.
The second snippet turns on the frontend debugger that allows you to debug CSS and JavaScript scripts. Use the debuggers only on development sites never in production.
# Turns on PHP debugger
define( 'WP_DEBUG', true );

# Turns on CSS and JavaScript debugger
define( 'SCRIPT_DEBUG', true );
2. Change database table prefix
WordPress uses the wp_ table prefix by default. If you want a more secure database you can choose a more complicated table prefix.
This config option also exists in the wp-config file by default, you only need to change the value of the $table_prefix variable to a more secure one.
Only change the table prefix if you have a clean install or on a development site, as it’s risky to do so on a production site.
# Creates secure table prefix for database tables
# Only numbers, letters, underscores
$table_prefix = 'a81kJt_';
3. Change WordPress URLs
You can set the WordPress and home URLs in the WordPress admin, under the Settings > General menu. However, you can also configure these URLs in the wp-config file.
Defining the WP_SITEURL and WP_HOME constants in the wp-config file has two advantages:
- it can be life-saving if you can’t access your admin area for some reason
- it can reduce the number of database calls while your site is loading (as wp-config overrides the options saved in the database)
WP_SITEURL specifies the URL users can reach your site with, while WP_HOME defines the root of your WP install. If you installed WordPress into your root folder (this is the default option) they take the same value.
# Specifies site URL
define('WP_SITEURL', 'http://www.yourwebsite.com');

# Specifies home URL (the root of the WP install)
define('WP_HOME', 'http://www.yourwebsite.com/wordpress');
4. Empty trash after a certain time
You can make WordPress to automatically empty your trash after a certain number of dates. The smallest value of this constant is 0, in this case you disable the trash feature.
# Empties trash after 7 days
define( 'EMPTY_TRASH_DAYS', 7 );
5. Enable WordPress cache
You can enable WordPress’ built-in caching feature with the following line of code. Most caching plugins, such as W3 Total Cache and WP Super Cache, automatically add this snippet to the wp-config file.
# Enables WP cache
define( 'WP_CACHE', true );
6. Enable WordPress Multisite
By adding the WP_ALLOW_MULTISITE constant to your wp-config file, you can enable WordPress’ multisite feature that allows you to create a network of WP sites.
# Turns on WordPress Multisite
define( 'WP_ALLOW_MULTISITE', true );
7. Redirect non-existing subdomains and subfolders
Sometimes visitors type a non-existing subdomain or subfolder into the URL bar. You can redirect these users to another page on your domain, for instance to the homepage with the help of the NOBLOGREDIRECT constant.
# Redirects non-existing subdomains and subfolders to homepage
define( 'NOBLOGREDIRECT', 'http://www.yourwebsite.com' );
8. Manage post revisions
WordPress has a built-in version control system, which means it saves all post revisions you create. A frequently edited post can have as many as 25-30 revisions that can take up a lot of database space after a while.
With the WP_POST_REVISIONS constant, you can maximize the number of post revisions or completely disable the feature.
# Completely disables post revisions
define( 'WP_POST_REVISIONS', false );

# Allows maximum 5 post revisions
define( 'WP_POST_REVISIONS', 5 );
9. Enable built-in database optimization
WordPress has a built-in database optimization feature you can turn on by adding the following line to the wp-config file.
I wrote in detail about how this tool works in this article. The most important thing to note is that the database optimization screen is available for anyone (even for non-logged in visitors). Enable the feature only for the period of time you want to run the optimization tool, then don’t forget to disable it.
# Turns on database optimization feature
define( 'WP_ALLOW_REPAIR', true );
10. Disable automatic updates
WordPress runs automatic background updates by default for minor releases and translation files.
You can toggle this feature on and off by setting the values of the AUTOMATIC_UPDATER_DISABLED (for all updates) and WP_AUTO_UPDATE_CORE (for core updates) constants according to the following rules:
# Disables all automatic updates
define( 'AUTOMATIC_UPDATER_DISABLED', true );

# Disables all core updates
define( 'WP_AUTO_UPDATE_CORE', false );

# Enables all core updates, including minor and major releases
define( 'WP_AUTO_UPDATE_CORE', true );

# Enables core updates only for minor releases (default)
define( 'WP_AUTO_UPDATE_CORE', 'minor' );
11. Increase PHP memory limit
Sometimes you may want to increase the PHP memory limit your hosting provider has allocated to your site, especially if you get the dreaded “Allowed memory size of xxxxxx bytes exhausted” message. To do so, use WP_MEMORY_LIMIT for the website and WP_MAX_MEMORY_LIMIT for the admin area.
Note that some hosts don’t allow to increase the memory limit manually, in this case contact them and ask them to do it for you.
# Sets memory limit for the website
define( 'WP_MEMORY_LIMIT', '96M' );

# Sets memory limit for the admin area
define( 'WP_MAX_MEMORY_LIMIT', '128M' );
12. Force SSL login
To increase website security, you can force users to log in through SSL every time. The FORCE_SSL_ADMIN constant makes SSL compulsory for both user logins and admin sessions.
Note that the formerly valid FORCE_SSL_LOGIN constant was deprecated in WordPress 4.0, so now you always have to use FORCE_SSL_ADMIN.
# Forces SSL login
define( 'FORCE_SSL_ADMIN', true );
13. Disable plugin and theme edits / updates
Administrators can edit plugin and theme files in the WordPress admin area. You can make your site more secure if you disable the plugin and theme editors using the DISALLOW_FILE_EDIT constant. So, if your site is hacked the hacker won’t have access to your plugin and theme files.
You can also disable the plugin and theme update feature using DISALLOW_FILE_MODS. This way administrators won’t be able to update plugins and themes in the admin area.
DISALLOW_FILE_MODS also disables the plugin and theme editor, so if you use it you don’t have to add DISALLOW_FILE_EDIT.
# Disables the plugin and theme editor
define( 'DISALLOW_FILE_EDIT', true );

# Disables the plugin & theme editor PLUS the plugin & theme update
define( 'DISALLOW_FILE_MODS', true );
14. Delete image edits
Whenever you edit an image, WordPress saves it in different resolutions. But, if you don’t want to use the earlier sets of images you can remove them by setting the value of the IMAGE_EDIT_OVERWRITE constant to true.
As a result, the earlier image files will be overwritten by the new ones when you edit an image and only the last set will be saved in the wp-content folder.
# Cleans up image edits
define( 'IMAGE_EDIT_OVERWRITE', true );
15. Disable unfiltered HTML
Although low-level users (subscribers, contributors, authors) can’t publish unfiltered HTML in WordPress, editors and administrators are allowed to do so.
By adding the following line of code to your wp-config file, you can increase security by preventing high-level users from publishing unfiltered HTML.
# Disables unfiltered HTML for admins and editors
define( 'DISALLOW_UNFILTERED_HTML', true );
Read Also: 5 Tips to Toughen Up Your WordPress Login Security