[ad_1]
Did you know that every day, 50,000 new WordPress sites come online? How are you going to stand out from the crowd in an ocean of different sites? By creating your own, unique, custom theme converted from PSD to WordPress that is designed specifically for your own site – that’s how!
There are three standards when designing a website theme. PSD (Photoshop files), WordPress (WP) and fairly recently these last few years, Twitter Bootstrap – a framework for developing responsive sites that industry professionals are using these days. In this post, we’re going to give you a complete and easy guide on how to combine all three: how to convert a PSD to a WordPress (Bootstrap) theme, in 5 easy steps.
Later on in this article, you’ll find templates, ready for download, for you to use as a basis for this tutorial.
But why would you want to convert a PSD file into a Bootstrap WordPress theme?
What is a PSD?
Most people who have been in or around the design and web design industry can easily understand this terminology – just like they would understand any other design terms which are not familiar to people outside of the niche (kerning, CMYK, padding, typography, leading, Serif etc.) But in reality, the term is very simple to understand.
PSD is short for PhotoShop Design, therefore PSD to WordPress is the process of converting a Photoshop design file to a working WP template using Bootstrap or other methodologies and frameworks.
This is because Photoshop is the single piece of software which is most popular with graphic and designers and how most WordPress website designs are created.
What is a WordPress Theme?
There are two primary aspects to creating a WordPress website usually.
(1) The actual look of the website, and
(2) the content of the site.
In WP, the most popular CMS for creating a site, the content is independent of how the website actually looks. How the website looks is actually defined by a WordPress theme. Think of themes like you would for smartphones, for your desktop computer or laptop or anything else which can be “skinned” to your preference. The template or theme you use can be used to “skin” the content, or give it a look and feel which you are opting for.
WordPress themes are a collection of PHP files which contain “commands” or specifications which define the colors and patterns, the styles, the icons, the fonts, the sizes of headers and text, the buttons and essentially the whole look of all of the elements of the website you are designing. There is a whole industry around these designs, where you can either get your template for free or buy one which is already made (typically called premium), for anything from $25 to a few hundred dollars.
There is also the option to create your own custom design, rather than go for a popular product which has already been created. This is the actual process of converting a PSD to a WordPress theme (what your website will look like in the end).
Going forward, we will guide you to the exact procedure of creating your own design.
PSD to WordPress Services
Before you continue reading – are you looking for developers or partners to help you with your website project?
You’re in the unenviable position of having to find a good reliable partner, without getting cheated, or lose a lot of time (and money) with a low-quality services provider.
Our experience in finding trusted developers has not been pleasant. We’ve had to deal with a number of major issues:
- Developers returning extremely low-quality code
- People who communicated very sporadically, creating significant communication problems
- Code which was 100% plagiarized creating legal issues for us
- Expensive rates, with quality which was mediocre at best
- Developers who vanished (or we never heard back from following deposits)
But don’t let this scare you from outsourcing, you just need to find a trusted company – and, we’re here to help!
Given that we’ve been in the business for over 15 years, we’ve built a network of providers who we know and trust when it comes to WordPress and web development services. These are fully outsourced providers who can work with you on a project basis.
Want to know more? Click below and we’ll put you in touch directly.
Not interested in hiring developers yet? Read on!
Converting a PSD to WordPress theme
Step 1: Slice the PSD File
In terms of our PSD to Bootstrap tutorial, “Slicing” is the first and foremost thing in the entire PSD to responsive WordPress conversion process.
The term “slicing” might seem quite confusing to you at first, but don’t worry too much about it. Slicing refers to cutting and dividing a single image file into multiple image files, each of which contains different design elements of the whole design. Some people refer to those as splicing because it is creating separate elements from a single design “organism” which will eventually be rearranged or synthesized and morphed into a complete design.
This is crucial since you can’t code a template/theme from a single image design file.
Therefore, to design a web page, you first need to slice the main image file into many individual image files and then sew them together seamlessly.
Usually, most web and graphic designers prefer to use Adobe Photoshop for slicing.
Although the same thing can be done using an equivalent image editing software like GIMP (GNU Image Manipulation Program) or any other imaging software package, we highly recommend you use Photoshop since it makes the job easier and faster, with tools such as Layers and Layer Masks, extracting Metadata, blending, manipulating and using PSD files and RAW images .
Whatever software/application you use, the main point is to come up with pixel-perfect image files in the end – representing the different elements of your eventual design.
Besides that, you don’t need to cut design elements – like header/footer color and solid color background – in full, which can be created dynamically. Instead, only cut design elements – like buttons and images – that cannot be created dynamically.
Find below a YouTube video which explains the basics of PSD Slicing
https://youtu.be/XgxEieLbloc
Step 2: Download and Bootstrap your theme
Once you have your image design file sliced, go to http://getbootstrap.com and download the latest version of Twitter Bootstrap from there. After completing the download, extract the zip file in a folder.
Now if you open the extracted folder, you’ll find three folders – css, fonts and js – inside it.
Note that one of the primary uses of this framework is because it makes extensive use of media queries to be able to create designs which work in any kind of device, allow your design to flow seamlessly between one size of device to another (xs – Extra Small, for mobiles, sm – Small, for tablets, md – Medium, for laptops and desktops and lg – Large, for Large desktops). This is called responsive web design.
Step 3: Create Index.html and Style.css Files
The next step is to code the sliced elements into HTML/XHTML format and style them using the CSS. For this, you need to create an index.html and a style.css file, which requires you to have enough mastery over HTML CSS. Essentially, we are converting the PSD to HTML, before we can proceed to the next steps.
Aside: HTML or XHTML represents (EXtensible) HyperText Markup Language, whiles CSS represents Cascading StyleSheets.
Since you want to develop your theme using Bootstrap, you’ll have to initialize Bootstrap in the head section and the associated JavaScript in the body section of your index.html page as follows:
<!DOCTYPE html>
<html lang=”en”>
<head>
<meta charset=”utf-8″>
<meta name=”viewport” content=”width=device-width, initial-scale=1.0″>
<link href=”https://cdn.collectiveray.com/css/bootstrap.min.css” rel=”stylesheet” media=”screen”>
</head>
<body>
<script src=”https://ajax.googleapis.com/ajax/libs/jquery/1.11.3/jquery.min.js”></script>
<script src=”https://cdn.collectiveray.com/js/bootstrap.min.js”></script>
</body>
</html>
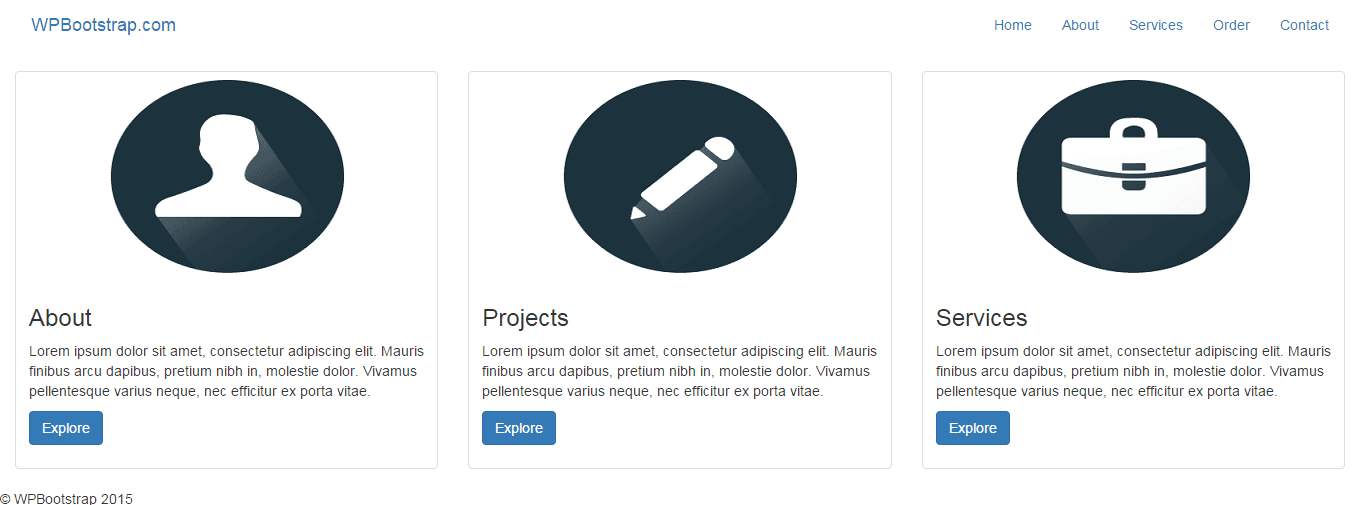
Now you can make use of Bootstrap components in your HTML template. For example, here we’re building a simple web page with a navigation menu and thumbnail components. The min part of bootstrap, means the file has been minified for performance reasons:
<!DOCTYPE html>
<html lang=”en”>
<head>
<meta charset=”utf-8″>
<meta name=”viewport” content=”width=device-width, initial-scale=1″>
<link href=”https://cdn.collectiveray.com/css/bootstrap.min.css” rel=”stylesheet” media=”screen”>
</head>
<body>
<div class=”container-fluid”>
<div class=”navbar”>
<a class=”navbar-brand” href=”#”>WPBootstrap.com</a>
<ul class=”nav navbar-nav pull-right”>
<li><a href=”#”>Home</a></li>
<li><a href=”#”>About</a></li>
<li><a href=”#”>Services</a></li>
<li><a href=”#”>Order</a></li>
<li><a href=”#”>Contact</a></li>
</ul>
</div>
<div class=”row”>
<div class=”col-sm-6 col-md-4″>
<div class=”thumbnail”>
<img src=”https://cdn.collectiveray.com/image1.png”>
<div class=”caption”>
<h3>About</h3>
<p>…</p>
<p><a href=”#” class=”btn btn-primary” role=”button”>Explore</a></p>
</div>
</div>
</div>
<div class=”col-sm-6 col-md-4″>
<div class=”thumbnail”>
<img src=”https://cdn.collectiveray.com/image2.png”>
<div class=”caption”>
<h3>Projects</h3>
<p>…</p>
<p><a href=”#” class=”btn btn-primary” role=”button”>Explore</a></p>
</div>
</div>
</div>
<div class=”col-sm-6 col-md-4″>
<div class=”thumbnail”>
<img src=”https://cdn.collectiveray.com/image3.png”>
<div class=”caption”>
<h3>Services</h3>
<p>…</p>
<p><a href=”#” class=”btn btn-primary” role=”button”>Explore</a></p>
</div>
</div>
</div>
<hr>
<footer>
<p>© WPBootstrap 2015</p>
</footer>
</div>
<script src=”https://ajax.googleapis.com/ajax/libs/jquery/1.11.3/jquery.min.js”></script>
<script src=”https://cdn.collectiveray.com/js/bootstrap.min.js”></script>
</body>
</html>
If you open this file in your browser, it should look something like this:
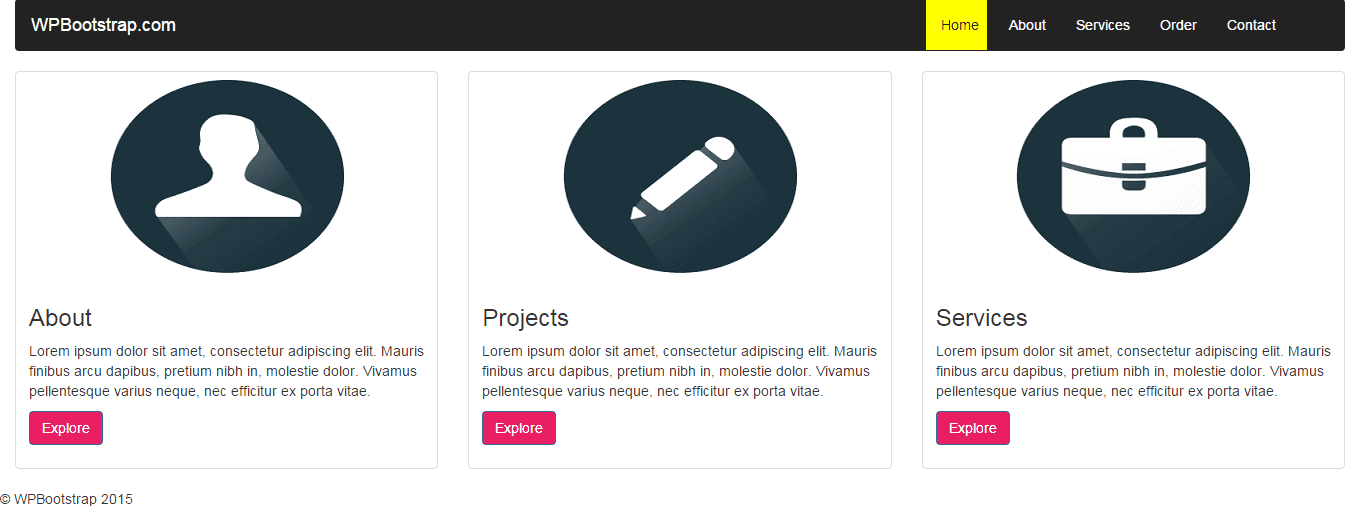
As you can see, no custom CSS is working on this page currently. So to style the contents of the html page according to our requirements, we’ll create a custom style.css file. For our example, we’ve added the following code to my custom CSS file:
.navbar {
background:#222222;
margin-bottom:0px;
border-radius:0px;
}
.navbar-brand {
color:#FFFFFF;
line-height: 50px;
padding-left: 10px;
}
a.navbar-brand:hover {
color:#FFEB3B;
}
.navbar ul {
padding-right:4%;
}
.navbar ul li a {
color:#FFFFFF;
margin-right:10%;
}
.navbar ul li a:hover {
color:#222222;
background-color: yellow;
}
a.btn-primary{
background-color: #E91E63;
color:#FFFFFF;
}
To get our newly created custom CSS file work, we need to include it in our HTML page (just like we did bootstrap.min.css). So include a reference link to the style.css file in your index.html file, just above the line where you referenced bootstrap.min.css.
<head>
<link href=”https://cdn.collectiveray.com/css/style.css” rel=”stylesheet” media=”screen”>
<link href=”css/bootstrap.min.css” rel=”stylesheet” media=”screen”>
</head>
<body>
…
…
</body>
Now open index.html file in your browser again and you’ll see the change – our custom CSS is working now, you can see the header bar at the top and the buttons with a different color from the default bootstrap buttons. All of the changes have been defined via the CSS file above.
This was just a simple example. Likewise, making use of Bootstrap, you can code up your entire PSD file (of course, after slicing) into HTML. At the end of this step, you’ll have two files in your hands: one is index.html and another is style.css.
So far we were mostly on a PSD to Bootstrap tutorial. Now comes the conversion to a Bootstrap WordPress theme.
Now, is the above is a bit too much work for you and you would you rather not start from scratch? This bundle of WP starter templates will help you get started with a number of starter themes which you can use to eventually produce your own custom design.
Download the 20 WP Starter Theme bundle now
As you can see converting from PSD to HTML is quite an important part of the whole process, but when you’ve got this out of the way, things get a little bit easier.
Step 4: Break Index.html File According to WP Theme Structure
The main reason for converting a Photoshop design file to WordPress is to create a well-functioning website template that could be uploaded to the website dashboard. Such themes as Divi and Avada, and other popular themes have a standard set of files which need to be implemented to be considered a valid WP theme. That’s what we will be doing in our next step.
Really and truly the next phases of this conversion are around the WordPress coding structure for themes and templates, because now we are taking our theme towards WP.
Now that you have the index.html file of your PSD, you need to break it into multiple php files according to WordPress themes file structure. Doing so, you would not only be able to convert the static index.html file to a dynamic WP theme but also be able to add various features and functions associated with WP to it.
(Aside, PHP is a server-side scripting language known as hypertext preprocessor.)
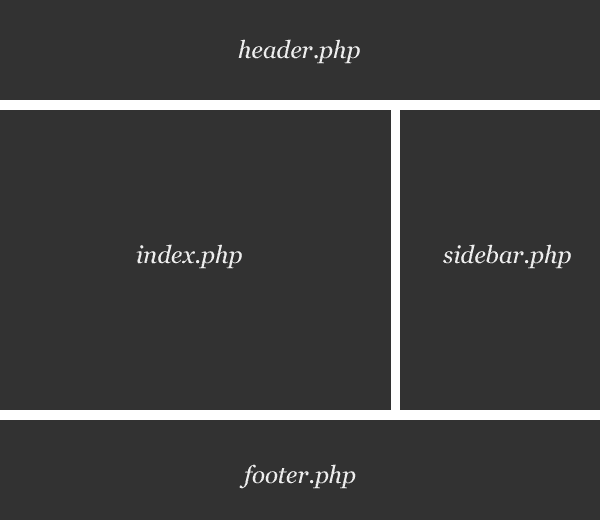
To facilitate better coding and categorization, a typical template is made up of several PHP files such as header.php, footer.php, index.php, sidebar.php, search.php and so on.
However, you only require index.php and style.css files to create a fully-functional WordPress theme. As a rough example, here we’re breaking our above created index.html file into three files: header.php, index.php and footer.php.
Let’s start with header.php. The entire HTML code that is included at the top of index.html page will go into the header.php file.
<!DOCTYPE html>
<html lang=”en”>
<head>
<meta charset=”utf-8″>
<meta http-equiv=”X-UA-Compatible” content=”IE=edge”>
<meta name=”viewport” content=”width=device-width, initial-scale=1″>
<link href=”https://cdn.collectiveray.com/css/style.css” rel=”stylesheet” media=”screen”>
<link href=”https://cdn.collectiveray.com/css/bootstrap.min.css” rel=”stylesheet” media=”screen”>
</head>
<body>
<div class=”container-fluid”>
<div class=”navbar”>
<a class=”navbar-brand” href=”#”>WPBootstrap.com</a>
<ul class=”nav navbar-nav pull-right”>
<li><a href=”#”>Home</a></li>
<li><a href=”#”>About</a></li>
<li><a href=”#”>Services</a></li>
<li><a href=”#”>Order</a></li>
<li><a href=”#”>Contact</a></li>
</ul>
</div>
While the middle part of index.html file will go into index.php file:
<div class=”row”>
<div class=”col-sm-6 col-md-4″>
<div class=”thumbnail”>
<img src=”https://cdn.collectiveray.com/image1.png”>
<div class=”caption”>
<h3>About</h3>
<p>…</p>
<p><a href=”#” class=”btn btn-primary” role=”button”>Explore</a></p>
</div>
</div>
</div>
<div class=”col-sm-6 col-md-4″>
<div class=”thumbnail”>
<img src=”https://cdn.collectiveray.com/image2.png”>
<div class=”caption”>
<h3>Projects</h3>
<p>…</p>
<p><a href=”#” class=”btn btn-primary” role=”button”>Explore</a></p>
</div>
</div>
</div>
<div class=”col-sm-6 col-md-4″>
<div class=”thumbnail”>
<img src=”https://cdn.collectiveray.com/image3.png”>
<div class=”caption”>
<h3>Services</h3>
<p>…</p>
<p><a href=”#” class=”btn btn-primary” role=”button”>Explore</a></p>
</div>
</div>
</div>
And our footer.php file would look something like this:
<hr>
<footer>
<p>© WPBootstrap 2015</p>
</footer>
</div>
<script src=”https://ajax.googleapis.com/ajax/libs/jquery/1.11.3/jquery.min.js”></script>
<script src=”https://cdn.collectiveray.com/js/bootstrap.min.js”></script>
</body>
</html>
Thus, this step includes breaking up your index.html file into header.php, index.php, footer.php and other necessary feature files according to WordPress themes file structure.
The complete list of files that every template should have can be found below – with an image to show how these relate to each other:
- style.css
- header.php
- index.php
- sidebar.php
- footer.php
- single.php
- page.php
- comments.php
- 404.php
- functions.php
- archive.php
- searchform.php
- search.php
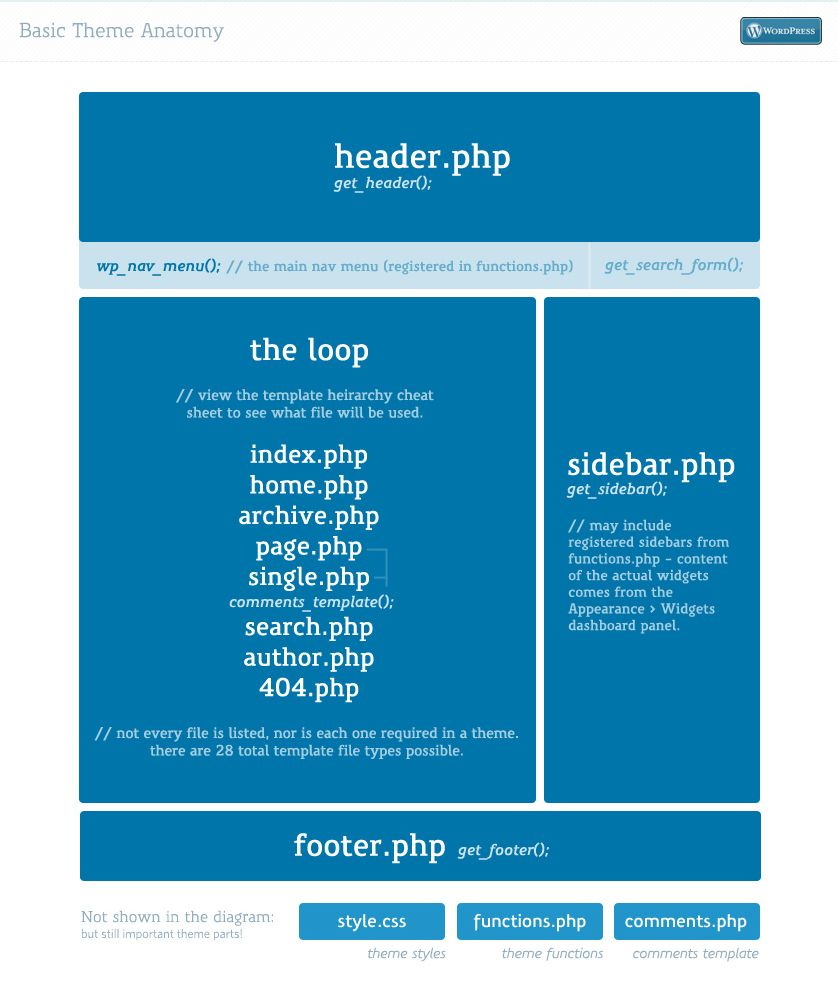
If you follow any guide to converting your Photoshop Design to WordPress, you’ll always find that they result in a structure similar to the following. The below is a more detailed view of what a final WP Theme should look like:
Step 5: Add Multidisciplinary WP Tags to your Bootstrap template
This is the final step of our tutorial.
The best thing about WP is that it offers a myriad of built-in functions in its coding reference and structure that can be used to add custom functions and features to a website theme. To incorporate any desired functionality into your WordPress themes, all you need to do is using the right set of inbuilt function tags in your files. The WP framework will take care of everything and that’s what makes the platform so powerful.
In the previous step, we’ve broken up the index.html file on the basis of the required file structure.
Now it’s time to add WP PHP tags to various theme files – like header.php, index.php, footer.php and sidebar.php etc – which we’ve got in the previous step and then combine them together to produce a highly-functional WordPress theme.
For our above example, here we’ve used the <?php bloginfo( $show ); ?> function in header.php to show our site’s title in a link:
<a href=”/<?php bloginfo(‘url’); ?>” title=”<?php bloginfo(‘name’); ?>” class=”navbar-brand”><?php bloginfo(‘name’); ?></a>
And for menu, we’ve used the <?php wp_nav_menu( $args ); ?> function as follows:
<?php wp_nav_menu( array(‘menu’ => ‘Project Nav’, ‘menu_class’,’nav navbar-nav pull-right’ )); ?>
Now, our header.php file would look like this:
<?php
?><!DOCTYPE html>
<html <?php language_attributes(); ?> class=”no-js”>
<head>
<meta charset=”<?php bloginfo( ‘charset’ ); ?>”>
<meta name=”viewport” content=”width=device-width, initial-scale=1″>
<?php wp_head(); ?>
</head>
<body <?php body_class(); ?>>
<div class=”container-fluid”>
<div class=”navbar”>
<a href=”/<?php bloginfo(‘url’); ?>” title=”<?php bloginfo(‘name’); ?>” class=”navbar-brand”><?php bloginfo(‘name’); ?></a>
<?php wp_nav_menu( array(‘menu’ => ‘Project Nav’, ‘menu_class’,’nav navbar-nav pull-right’ )); ?>
</div>
The footer code for our footer.php will remain same except adding <?php wp_footer(); ?> function.
<?php?>
<footer>
<p>© WPBootstrap 2015</p>
</footer>
</div>
<?php wp_footer(); ?>
</body>
</html>
Now let’s move to index.php. To show our thumbnail components, we’ve used <?php dynamic_sidebar( $index ); ?> function.
<?php
get_header(); ?>
<div class=”row”>
<?php dynamic_sidebar(‘sidebar-1’); ?>
<?php dynamic_sidebar(‘sidebar-2’); ?>
<?php dynamic_sidebar(‘sidebar-3’); ?>
<hr>
<?php get_footer(); ?>
That’s not enough! To show our thumbnail components properly, we need to define sidebar-1, sidebar-2 and sidebar-3 in our functions.php file as follows:
function wpbootstrap_widgets_init() {
register_sidebar( array(
‘name’ => __( ‘Widget Area’, ‘wpbootstrap’ ),
‘id’ => ‘sidebar-1’,
‘description’ => __( ‘Add widgets here to appear in your sidebar.’, ‘wpbootstrap’ ),
‘before_widget’ => ‘<aside id=”%1$s” class=”widget %2$s”>’,
‘after_widget’ => ‘</aside>’,
‘before_title’ => ‘<h2 class=”widget-title”>’,
‘after_title’ => ‘</h2>’,
)
register_sidebar( array(
‘name’ => __( ‘Widget Area’, ‘wpbootstrap’ ),
‘id’ => ‘sidebar-2’,
‘description’ => __( ‘Add widgets here to appear in your sidebar.’, ‘wpbootstrap’ ),
‘before_widget’ => ‘<aside id=”%1$s” class=”widget %2$s”>’,
‘after_widget’ => ‘</aside>’,
‘before_title’ => ‘<h2 class=”widget-title”>’,
‘after_title’ => ‘</h2>’,
)
register_sidebar( array(
‘name’ => __( ‘Widget Area’, ‘wpbootstrap’ ),
‘id’ => ‘sidebar-3’,
‘description’ => __( ‘Add widgets here to appear in your sidebar.’, ‘wpbootstrap’ ),
‘before_widget’ => ‘<aside id=”%1$s” class=”widget %2$s”>’,
‘after_widget’ => ‘</aside>’,
‘before_title’ => ‘<h2 class=”widget-title”>’,
‘after_title’ => ‘</h2>’,
)
);
}
add_action( ‘widgets_init’, ‘wpbootstrap_widgets_init’ );
This will register three widget areas in the WP dashboard, where we would need to put the “HTML code” for each thumbnail component in sidebar-1, sidebar-2 and sidebar-3 widgets respectively. For example, we’ll use the below code in sidebar-1 widget.
<div class=”col-sm-6 col-md-4″>
<div class=”thumbnail”>
<img src=”https://cdn.collectiveray.com/image1.png”>
<div class=”caption”>
<h3>About</h3>
<p>…</p>
<p><a href=”#” class=”btn btn-primary” role=”button”>Explore</a></p>
</div>
</div>
</div>
And so on!
The last thing we need to do is to load our stylesheets. This can be done by using wp enqueue style () in the function.php file, as follows.
// Load the main stylesheet
wp_enqueue_style( ”wpbootstrap-style’, get_stylesheet_uri() );
// Load Bootstrap stylesheet
wp_enqueue_style( ‘wpbootstrap’, get_template_directory_uri() . ‘/css/bootstrap.css’);
For a complete list of all tags and functions available, we recommend you go through these official Codex pages:
- Template Tags: This page provides you a complete list of WP tags, each of which has a dedicated page where you can find more information about a particular tag.
- Function Reference: This page is a reference guide to all PHP functions used in WordPress software. Like Template Tags, every PHP function is linked to a dedicated page where it is explained in detail with appropriate examples.
After adding essential WP tags and functions, all these files will be placed in a single folder having a similar name to the theme name. Thereafter, you would need to place this folder in /wp-content/themes/ directory of your website installation. And that is the final step of the tutorial!
Once you have done that, you would have a well-functioning responsive WordPress theme using Bootstrap that you can activate via the WP dashboard.
Ready to kick things off?
Start your WP Theme by Downloading the 20 Starter bundle now
A few additional thoughts
Slowly but surely, Responsive Web Design has become a dominant standard for building future-ready websites. These days, almost all websites are powered by this amazing technique to deliver users an optimal viewing and interaction experience, irrespective of the device they are using, whether it’s a phone, tablet or laptop/desktop device.
According to a recent survey conducted by the Google Webmaster team on Google+, over 81% people prefer to use a responsive design approach to make their websites render properly on all kind of devices.
That’s why it is essential to learn how to create a WordPress website theme using Twitter Bootstrap or another responsive framework for your web design from a PSD. While there are plenty of free website themes, creating your own custom WP theme using Bootstrap is the ultimate expression of creativity in web design.
Even though WP dominates over 24% of all websites, converting a Photoshop file (PSD) into a well-functioning responsive theme is not as easy as you think. This requires you to have a good grip on writing CSS media queries that ultimately dictate whether or not a template is responsive.
Wouldn’t it be better if you get a pre-coded responsive stylesheet packed with all essential features?

Thanks to Bootstrap, the world’s most popular responsive front-end framework, for making developers’ life easier, this is now a fairly simpler task than it used to be. In this article, we’re going to show you how to turn a PSD template into a responsive WordPress theme using Bootstrap as your development framework.
Once again, we first converted our PSD to Bootstrap, so essentially, the first part is really and truly a PSD to Bootstrap tutorial.
Later, in the second part converts the files we developed into a WordPress theme, so at that point, it all becomes a PSD to Bootstrap tutorial.
Download our pack of 20 WordPress (Bootstrap or not) Starter Themes
Just like always, we like to make your life easier by giving you a bunch of things to help get you started. After you’ve learned the basics of creating a WP theme, why not get started with one of the WordPress Starter themes.
Download our 20 WP Starter Theme bundle
Top Essential Tip:
Creating a great website design requires quite an advanced skill set. Although writing it yourself might seem like the best option, hiring a great WordPress developer (for example from Toptal) is probably much more cost-effective in the long run. In essence, you’ll get a great result, in a very short time.
Check out Developers on Toptal now
Final thoughts
That’s all for now about how to create a responsive Bootstrap WordPress theme from a PSD file. Whether you’re a newbie or a pro, this PSD to Bootstrap tutorial and then to WP should surely provide you with the most simplified way of achieving your desired result.
However, if you face any kind of problems in the PSD to WordPress conversion process, there are two things you can do. You can hire a web developer on Toptal, where they have the top 3% of talent worldwide, so you don’t have to worry about quality. Alternatively, you can hire a professional WordPress developer.
Tell us what you think? Do you need some more details in any specific parts of this tutorial / guide? We’d love for this guide to be useful to you, so please help us help you!