In this troubleshooting guide, Windows Report will show you how you can fix the Failure configuring Windows updates, reverting changes error message you get on your Windows 10 or Windows 7 operating system.
Following the steps below will not take you more than five minutes but you must follow them in the exact order they are presented — otherwise they will have no effect on this issue.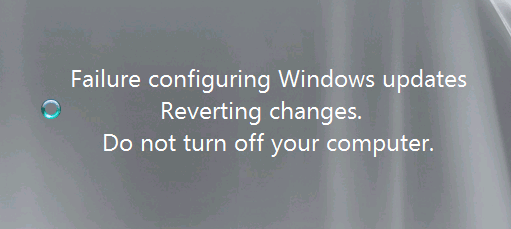
You get the error Failure configuring Windows updates. Reverting changes. Do not turn off your computer on Windows 7 or Windows 10 because of the secure boot feature you have in the system.
Disabling this during the update procedure and enabling it after the process is finish solves this issue and you can get back to your every day work on your computer
SOLVED: Failure configuring Windows updates
- Disable Secure boot
- Hard reset your laptop
- Disable your antivirus
- Run the Update Troubleshooter
- Clean boot your computer
- Restart the Windows Update Service
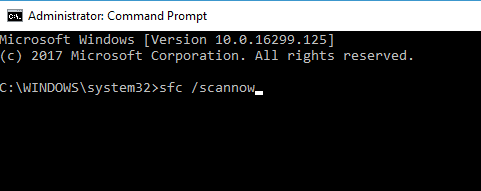
Before diving into the troubleshooting steps below, it might be a good idea to run a quick SFC scan. Update errors are often triggered by corrupted or missing system files. The good news is that the System File Checker can quickly identify and repair these problematic files. In order to run the scan, launch Command Prompt as an administrator and simply type the command
sfc /scannow and hit Enter.
If the issue persists, go ahead with the solutions below.
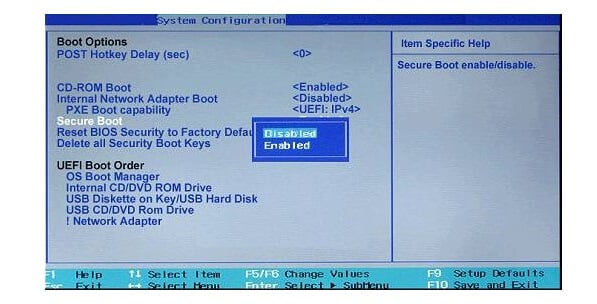
Step 1: Disable Secure boot
- Reboot your Windows 10 system.
- When the system starts up you will need to continuously press the “Esc” button on the keyboard.
- You should have in front of you the “Startup menu” on a black background.
- Move to the “System Configuration” tab using the right arrow on the keyboard.
- In the “System Configuration” menu you will need to select “Boot options” by pressing the “Down” arrow on the keyboard.
- Press the “Enter” button on the keyboard.
- Move with the arrows on the keyboard down to “Secure boot” feature.

- Press the “Enter” button on the keyboard.
- Select the “Disable” option on this feature and press the “Enter” button.
- Press the “F10” button on the keyboard to save your changes and exit the menu.
- Press the “Enter” button to confirm the saved changes.
- Your Windows 10 device should reboot now.
- Check and see if you still have the same error message.
- If you don’t you will need to let your system finish the updates and enable the “Secure boot” feature after it is done.
Secure Boot stopped working? Nothing to worry about! Check this guide to solve the problem!
Step 2: Hard reset your laptop and remove all peripherals
- Shutdown your Windows 10 device.
- Remove any external USB peripherals from the laptop.
- Remove any other additional wires from your external devices to the laptop.
- Unplug the power adapter from your Windows10 device.
- Press and hold the power button on the laptop for about twenty seconds.
- Plug only the power adapter to the laptop.
- Press the power button to open your device.
- You should get to a black background screen where you have to select the “Start Windows normally” feature.
- Press the “Enter” button on the keyboard.
- Run Windows Update again.
- After the update process is finished, connect all your peripherals to the laptop.
- Reboot yourWindows 10 device.
- Check and see if you still have the same issue.
Step 3: Disable your antivirus/ firewall
- First, you need to disable your Antivirus application.
- Second, you need to turn yourWindows 10 firewall off.
- When you’re done, try updating the system again and check if you still have this issue.
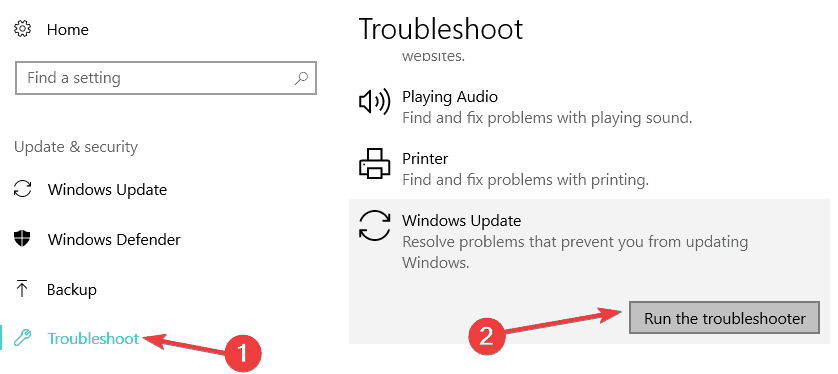
Step 4: Run the Update Troubleshooter
If the problem persists, run the built-in Windows Update troubleshooter. If you’re running Windows 10, simply go to Settings > Update & Security > Troubleshoot > select the Update troubleshooter and run it.
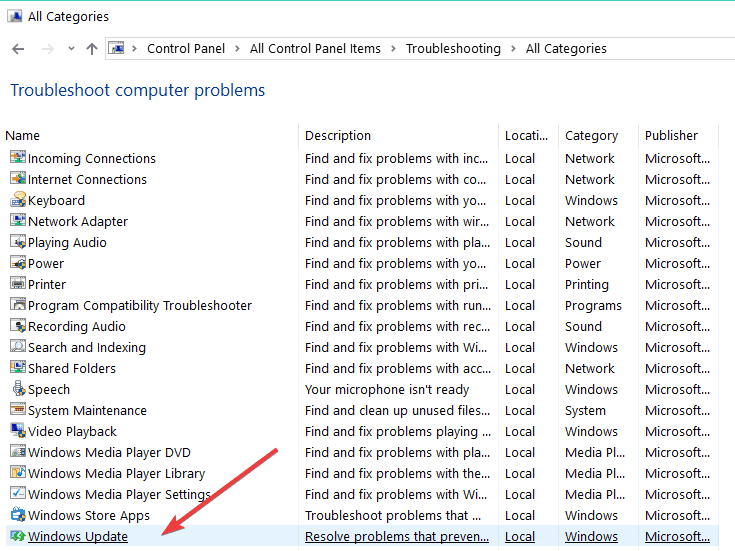
If you’re running Windows 7, you can find the Update troubleshooter on the Control Panel page. So, here are the steps to follow:
- Launch Control Panel, type ‘troubleshoot’ in the search bar and select Troubleshooting.
- In the left-hand pane, select View All and locate the Update troubleshooter.

- Run it, restart your computer and then check for updates again.
Find and fix Windows issues more efficiently with these perfect troubleshooting tools!
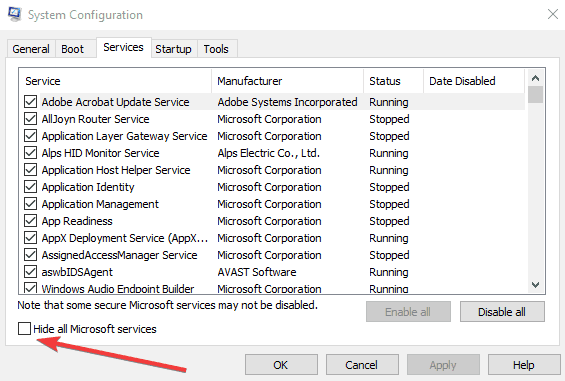
Step 5: Clean boot your computer
- Go to Start > type msconfig > hit Enter
- Go to System Configuration > click on the Services tab > check the Hide all Microsoft services check box > click Disable all.

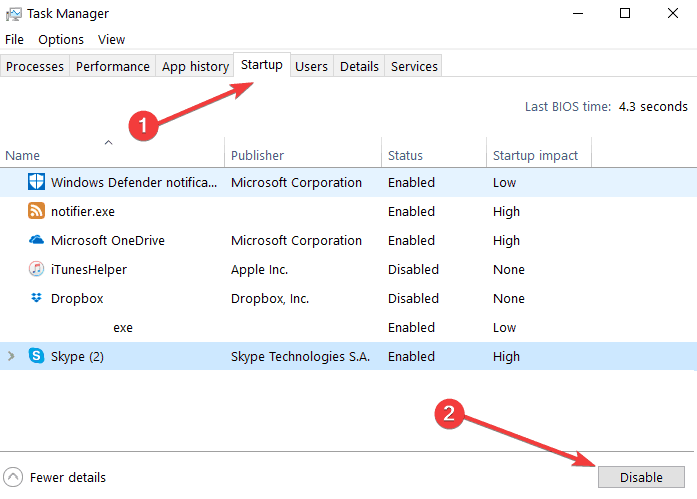
- Go to the Startup tab > Open Task Manager.
- Select each startup item > click Disable > close Task Manager > restart the computer.
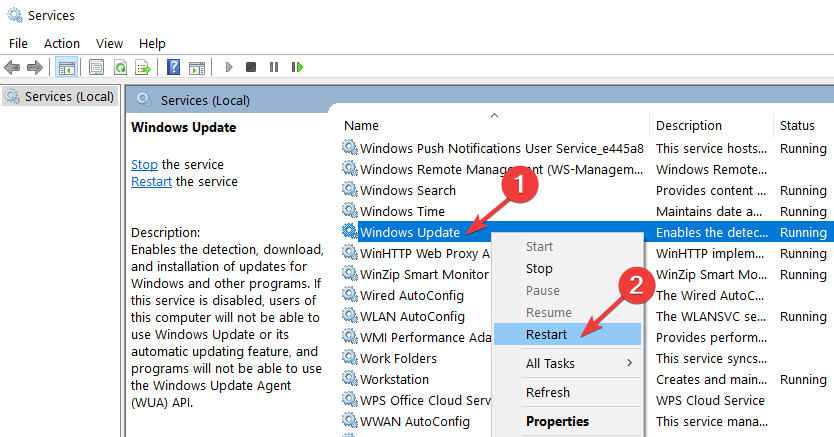
Step 6: Refresh/ restart the Windows Update Service
- Launch a new Run window > enter services.msc > hit Enter
- Locate the Windows Update Service > right-click on it > select Refresh and then Restart

- Check for updates again.
That’s it, there are a few simple tutorials on how to solve your Windows configuring updates issue and get your system up and running again.
Let us know if these solutions were helpful. If you have any questions about this post, write them in the comments below.
By the way, we’ve written extensively on Windows Update errors. Don’t forget to bookmark this page linking to our wide collection of troubleshooting guides.
Editor’s Note: This post was originally published in November 2014 and has been since updated for freshness, and accuracy.